Trelayna found this picture of Link. We used this to create her costume.
Showing posts with label costumes. Show all posts
Showing posts with label costumes. Show all posts
Sunday, August 28, 2011
Sunday, May 22, 2011
Barnes & Nobles American Girl Demo
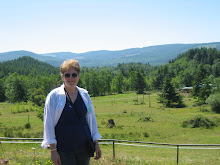
 The costume I'm wearing represents the 1896 time frame, near the Gibson Girl era. As you can see on my earliest entry, I mention this outfit and the event that it was made for.
 At the barnes & Nobles event, I dressed up my 5 dolls in different outfits. This is my most favorite, the Medieval Traveling outfit. You can see additional pictures of this outfit under the American girl doll label.
 This outfit for the doll was inspired, Ohh, do you see the similarity?....it was inspired by my outfit. My doll is also wearing a Gibson Girl outfit made with the same fabric as mine. I'll post her outfit next time so that you might see the details a little bit better. Since I just finished her outfit that morning, I wasn't able to include a not made up hat and fan. You can see the other dolls behind me, from left to right - Elizabethean outfit (my creation), Tinkerbell, Felicity's day dress [worn by Elizabeth] with matching purse [the object of the demo]
 Here I am showing my audience how to make the stitches in the fabric
 and helping them out with any questions,
  The girls loved to ask questions. We talked about the time period of these outfits, colors and fabrics, designing and the process of putting it all together.
 It was a lot of work putting all this together, but, I must say, I truly enjoyed this short time interacting with them, the interest and the wanting to learn, and especially, the end result: "I really did do this all by myself!".
 I want to give thanks to Anna, the Barnes & Noble children supervisor at the Silverdale Mall, for helping and especially for providing a fun program for the American Girl Club throughtout the year.
Sunday, December 12, 2010
Here Comes Santa!!!

Traveling Outfit in Royal Blue

Traveling Outfit

The bodice has silver eyelets and is closed with matching blue suede.
Another Traveling Outfit in Royal Blue


Tuesday, November 30, 2010
Renaissance Traveling Outfit

Thanks to my younger daughter, I have enough fabric to make quite a few outfits for the dolls. This outfit is made out of olive green microsuede. My daughter needed a cloak for a Renaissance Faire. I provided the 50% coupon for $12.99 yard fabric in exchange for the leftovers. Great deal!
I machine embroidered a design with silver thread and it came out beautifully. I enjoy sewing on microsuede. It doesn't fray, easy to cut, works well. Just a reminder, cut the fabric in the same direction. It will show if you don't.
Friday, February 19, 2010


I decided not to make a coif. The decorations would have been sewn framing the face. Instead, I decided to add them to the crescent. It is really not authentic, but wearing 3 items on the head was a bit too much for me. 

I found some gold ribbon 1-1/2" wide and carefully pleated it manually by machine. I couldn't use my pleater, the ribbon was too fragile. In my stash of antique jewelry, I found this gold necklace with a string of pearl attached. Perfect! It was also the correct length. It was handstitched at the lower edge of the crescent above the pleated ribbon.

Saturday, January 23, 2010
Celtic Wedding Dress

This dress was a challenge to make because of all the eyelets


Sunday, December 27, 2009

Wednesday, December 16, 2009
Oh My Goth!

This dress was custom ordered for a Halloween party. The sleeves end at the elbows, but the lace overlay attached at the elbow reaches almost down to the floor. The dress is made of crushed velvet and bridal lace.
Saturday, October 31, 2009
Costumes! Ah, what fun!!

Halloween Night!! What a perfect day to talk about costumes. I just don't enjoy making and designing costumes for others, but I also enjoy dressing up myself. This is one of my designs that I truly enjoyed putting together for a Fantasy Fair. I also wore it for Halloween Night passing candy at the local mall. The children loved it!
Subscribe to:
Posts (Atom)