Wednesday, December 29, 2010


This was taken at the Craigdarrock Castle in Victoria, BC.  Craigdarroch was built between 1887-1890 for Robert Dunsmuir, a Scottish immigrant who made his fortune from Vancouver Island coal. This legendary Victorian mansion, built on a hill overlooking the City of Victoria (Craigdarroch means "rocky, oak place" in Gaelic) announced to the world that Robert Dunsmuir was the richest and most important man in Western Canada. He died in 1889 leaving his entire estate to his wife Joan who lived in the Castle until her death in 1908. The immense fortune of the Dunsmuir family is reflected in the four floors of exquisite stained glass windows, intricate woodwork and fabulous Victorian era furnishings.


One of the rooms in the Castle
Posted by Picasa
Craigdarrock Castle, Victoria, BC

Another gown from the Castle. I couldn't get a better photo. There wasn't enough lighting.
Posted by Picasa

Sunday, December 12, 2010

Here Comes Santa!!!

Yes, his beard is real!!  This is a co-worker who needed a Santa's outfit.  The outfit has the coat, pants, hat and sack. It was an easy outfit to make except for the trim.  The trim was purchased as a band trim instead of a fabric cut.  The collar is cut on a curve.  I had to piece the trim to show the least amount of seams.  My co-worker was happy with the results and so was I.

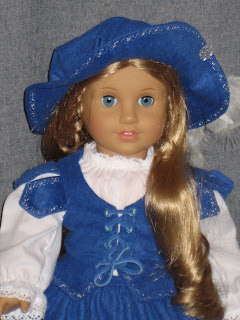
Traveling Outfit in Royal Blue

The fabric I used is Microsuede.  It is a wonderful fabric to sew with.  Since I only bought one and a half yard of this fabric, I was able to make three outfits with this material.  One is the skating outfit and the other is also a Renaissance outfit

Traveling Outfit

A close up view of the front. The edges of the bonnet, tabs and peplum are embroidered with silver thread in a scroll design.
The bodice has silver eyelets and is closed with matching blue suede.

Another Traveling Outfit in Royal Blue

This shows the side view and the marabou feathers on her bonnet.  You can also see some of the detailing on the tabs and peplum of the vest and the edge of her skirt

Traveling Outfit

The Traveling Outfit in a purple color with black trim

Tuesday, November 30, 2010

Renaissance Traveling Outfit

This is one of my favorite patterns. The outfit includes a white long sleeve blouse, skirt, peplumed vest and bonnet. 
Thanks to my younger daughter, I have enough fabric to make quite a few outfits for the dolls.  This outfit is made out of olive green microsuede.  My daughter needed a cloak for a Renaissance Faire.  I provided the 50% coupon for $12.99 yard fabric in exchange for the leftovers.  Great deal!

I machine embroidered a design with silver thread and it came out beautifully.  I enjoy sewing on microsuede.  It doesn't fray, easy to cut, works well.  Just a reminder, cut the fabric in the same direction.  It will show if you don't.

Renaissance Traveling Outfit

This is the back view of the vest and hat.  The color of the fabric is more like an olive color, quite a bit darker than the picture shows.  The feathers are olive and black which goes quite well with the outfit.  Notice the embroidery along the brim of the bonnet and the tabs.

Renaissance Traveling Outfit

This is the inside of the vest.  It is completely lined and could have been worn reversed if it had a different lining.

Wednesday, March 31, 2010

Lady Lillian


Doesn't she just look lovely!  She's all dressed up and ready to go to the Faire with the other maidens in the Castle. Her dress is made of rich green satin, completely lined and held closed in the back with 3 snaps.  I could have laced the back of the dress but I wanted a little girl to enjoy this outfit. Lady Lillian wears a circlet made of the same fabric and trimmed with irredescent ribbon. Her long sleeves and neck scarf is made of embellished  sheer fabric.  A braided belt made of the fabrics from her dress encircle her waist and ends in a single braid down the front.

Lady Lillian


This is the back view of the dress.  All of the dresses I have made so far have included snaps in the back,  It's extra work but I just don't like velcro.  Little girls need to learn dexterity and what better way than to include snaps..!

Lady Lillian

Her dress is completely lined.  She almost could wear this dress inside out.

Lady Lillian

This picture shows the lined dress and her circlet.  She wears a stiff petticoat to add that extra fullness to the dress.

Chinese Lady - side view


My daughter's doll, Lillian Jean, is the model for all these dresses.  She owns this one and only wears it on special occasions. The edges are trimmed with gold bias binding.

Chinese Lady

It is always a little bit difficult to find fabric to scale for small clothing project.  I had some fabric that my son picked up in S. Korea for me and I decided to put one of them to good use. This brocaded jacquard frays easily and has to be handled carefully, especially doing small seams.

Sunday, February 21, 2010

Pink Party Dress with Matching accessories

This pink confection has 2 layers of bridal illusion tulle cut in different lengths. The fully lined bodice has a sheer ribbon waistband. A ribbon rose with cascading ribbons is attached at the waitline. A rose and ribbon bow adorn each sleeve. The back of the bodice is closed with 3 snaps.
She wears a matching sheer ribbon headband which is embellished with a rose and cascading ribbons. On her wrist, she has a matching corsage.
This dress can be seen also at etsy.com and can be part of your doll's outfit.  I can make one for you in a different color. 

Friday, February 19, 2010

Ren Faire Dress

The Finished Product

This dress is the same as the blue one, except I'm wearing a farthingale.  I'm not wearing the bun roll, it was a little bit uncomfortable to wear.

Making of the French Hood

I didn't document how I got to this stage in the construction of the crescent.  It was with a lot of trial and error to get the correct shape and looking at a lot of portraits and information.  Instead of using buckram, I used super heavy pellon that is adhesive on one side.  I cut 3 pieces for added strength.  It is very lightweight so that's not an issue.  My husband purchased #18 gauge wire and with that I wired the outside of the crescent and held it in place by sewing it to the form with heavy duty thread.

French hood

This is what it looks like after the wire has been attached to the crescent.

french Hood

I laid my finished form onto the fabric and cut around it, leaving enough for a seam
As you can tell in this picture, the fabric has been cut and stitched.  Notice the extra fabric on the lower edge.  this part will be handstitched closed.
This is what it looks like after all the stitching has been done.              Now the fun begins!


This is from one of my favorite book.  full of Information. I was able to cut the hood according to the directions that I found here.
I decided not to make a coif.  The decorations would have been sewn framing the face.  Instead, I decided to add them to the crescent.  It is really not authentic, but wearing 3 items on the head was a bit too much for me.
I found some gold ribbon 1-1/2" wide and carefully  pleated it manually by machine.  I couldn't use my pleater, the ribbon was too fragile.  In my stash of antique jewelry, I found this gold necklace with a string of pearl attached.  Perfect!  It was also the correct length.  It was handstitched at the lower edge of the crescent  above the pleated ribbon.
This shows the gold chain woven with  pearls.  Just the perfect item for the inner edge of the crescent 
This page shows detailed information about the hood.  I took a shortcut.  Instead of wearing a coif, hood and crescent, I deleted the coif as mentioned earlier, then I attached the hood to the crescent, making it one piece instead of two.  Since I have short hair, placing bobby pins to hold the French Hood in place didn't work out.

Billament added

The billament was extremely easy to make.  I found some thin wire in my basket and after my return trip from Michaels and Joann's, I was able to come up with a beaded trim.  Try and get a close up look and you'll then be able to see the detailling.  I used gold thread to sew it on the upper edge of the crescent.                                                            In this photograph, the hood is already in place.  To hold the French Hood on my head, I sewed a piece of black elastic at both corners.  I can either  wear it with the strap under my chin or behind and under my hair.

Wednesday, February 17, 2010

Tudor Lady

This dress was fun to put together.  I did have a hard time finding the pleated fabric, and the color goes so well with the teal corduroy.  I still have the same fabric left over and can make one for you. It's a one piece dress and comes with a petticoat and the French Hood.  contact me for pricing.

Saturday, January 23, 2010

Celtic Wedding Dress

This Medieval wedding dress was made for a friend of mine. Her dress is made of satin in two different colors.  The velvet bodice and the skirt front is trimmed with rhinestones.  The sleeves are lined and trimmed with silver lace.
This dress was a challenge to make because of all the eyelets

Both sides of the bodice, the back and the armhole, including the skirt, required about 80 eyelets to be inserted.  This pictures shows the side of the bodice.  The upper part of the picture shows the eyelets for the attachment of the sleeves. I used silver cord and covered all the ends with aiglets.
This dress is worn by the lead soprano in "la Boheme" from the Kitsap Opera. Unfortunately, there wasn't much light in the tiny hallway.  The fabric is medium weight cotton with a tiny print.  There is satin trim around her neckline, sleeves and the edge of her skirt.  She is not wearing her lacy bonnet.

Friday, January 22, 2010

Cinderella 1

This is one of the first Cinderella dress that I made for a customer.   The bodice is lined and is closed with 3 snaps. The dress also includes a tulle petticoat.

Cinderella 1


The bodice is made of gold lame fabric.  The skirt is light blue satin with an overskirt of chiffon painted with gold stars.
The neckline and the front of the overskirt is trimmed with a gold/irredescent trim. 
.

Saturday, January 9, 2010

sleeve detail

Tudor Princess


The front opening of the gown and along the hemline is embellished with fancy stitching and beaded embroidery.  The same embellishment is found on the hood and the sleeves.  The hood is finished with a gold mesh veil.

Tudor Princess


This Tudor Princess was made especially for my daughter's American Girl doll.  It  consist of a long sleeved blouse, taffeta skirt, a laced overgown and a French hood.