Sunday, May 22, 2011

Barnes & Nobles American Girl Demo

The costume I'm wearing represents the 1896 time frame, near the Gibson Girl era.  As you can see on my earliest entry, I mention this outfit and the event that it was made for. 
At the barnes & Nobles event, I dressed up my 5 dolls in different outfits.  This is my most favorite, the Medieval Traveling outfit.  You can see additional pictures of this outfit under the American girl doll label.
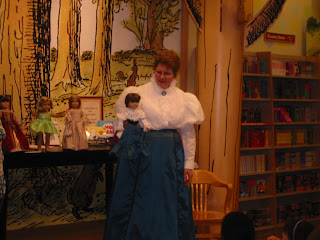
This outfit for the doll was inspired, Ohh, do you see the similarity?....it was inspired by my outfit.  My doll is also wearing a Gibson Girl outfit made with the same fabric as mine.  I'll post her outfit next time so that you might see the details a little bit better.  Since I just finished her outfit that morning, I wasn't able to include a not made up hat and fan. You can see the other dolls behind me, from left to right - Elizabethean outfit (my creation), Tinkerbell, Felicity's day dress [worn by Elizabeth] with matching purse [the object of the demo]

Here I am showing my audience how to make the stitches in the fabric

and helping them out with any questions,

The girls loved to ask questions.  We talked about the time period of these outfits, colors and fabrics, designing and the process of putting it all together.


It was a lot of work putting all this together, but, I must say, I truly enjoyed this short time interacting with them, the interest and the wanting to learn, and especially, the end result:  "I really did do this all by myself!". 
I want to give thanks to Anna, the Barnes & Noble children supervisor at the Silverdale Mall, for helping and especially for providing a fun program for the American Girl Club throughtout the year.

Barnes & Nobles American Girl Demo

I started with 3x8 inches of cotton fabric,
made channels at either ends with the sewing machine.  Then I had the little girls sew the side edges with yarn and a blunt end large needle.  I was amazed that a young girl of 4 was able to do quite a good job.  I cut twenty five of these for the girls to sew by themselves.  then I went to extra mile........


I cut an additonal  25 of these and sewed them up, placed som decorations on the front, as seen on both of these.  then I proceeded to insert narrow satin ribbon, as can be seen on the left side of the top picture.....

The finished product.  I gave each of the girls one of these to take home as a job well done.  They were quite excited about them.  and they all chose the same fabric purse as the one they had been working on.  I had an hour for the demonstration. 

Friday, May 6, 2011

1896 Outfit for the Chula Vista Historical Homes Tour April 30, 2011

These lovely ladies are part of the San Diego Costume Guild and I was honored to have been invited to have our picture taken as a group.
By the way, the temperature  on that day was 86 degrees. 
This is my almost finished version of  1896 time period.  I am missing a hat, parasol and gloves.  Unfortunately, this photo doesn't show the bottom of the skirt which is edged with trim and lace.

1896 Outfit for the Chula Vista Historic Homes Tour

I started with this blouse that I found at Goodwill for a couple of dollars.  I love the details on the front of the blouse with all the pintucks, the cuffs and 6 shell buttons and matching buttons down the front. 
To make it period, I folded down the pointed collar on the inside and sewed it in place.  For inspiration, I looked through several books on my shelves, especially this one:"Harper's Bazaar, Victorian Fashions & costumes from 1867 - 1898" by Stella Blum.  I added narrow lace to the pintucks to soften the effect.  Added bouffant upper sleeves  and edged the bottom of the seam with white cotton lace.  I applied lace in the inside of the cuffs and edged the outside with the same cotton lace as the upper sleeves.  Small note:  the same cotton lace, but in black adorns the bottom of the skirt.

1896 Blouse for the Historical Home Tour

This is the finished version of the blouse. Notice the detail below the full upper sleeves and the cuffs. On the last picture at the bottom, I am wearing a ruffled lace front attached to the blouse with a lovely antique cameo.

Creating the 1896 Outfit

I used the skirt pattern from Simplicity 4156
The skirt in it's almost finished stage. The waistband needs to be finished and the length of the skirt measured and hemmed.  I had yet to decide how I was going to trim the front and bottom of the skirt.  Normally, I let things sit for a little while till I come up with a design that I really like and then proceed.